A test drive of the Intel Neural Compute Stick 2

Aleksandr Dolgaryev
CTO
Introduction
Neural networks, Computer Vision and Internet of things have naturally become buzz words over the last 10 years. Even though almost everyone has heard about these technologies, even the development of a simple system required a very deep understanding of the topic, as well as solid coding skills. These fields stayed available only for a close circle of professionals. It wasn’t until the development of the hardware and high-level Deep Learning libraries that everyone who has a computer got access to this technology. Fortunately, today having a Google account means that you can develop your neural network by using the Colab tool. As long as you have your network trained you would want to use it, and if the situation with online models can be solved by using a powerful computer or even a cloud cluster, deploying to embedded devices was still a challenging task until recently.
There is a wide variety of microcomputers available today the cost of which varies from 10 to 1000 dollars, and such a variety gives a lot of space for imagination and experiments. Unfortunately, the performance of these products is directly proportional to their price, and a recent paper by my colleague shows that it is impossible to get real-time object detection solutions based on Raspberry 3 B and you have to pay for more expensive analogs if you want an improvement in FPS.
Luckily there is an Intel Neural Compute Stick 2 — a tiny USB device that can boost the performance of your laptop or microcomputer. It can provide more freedom for your prototypes and only costs under a hundred dollars.
In this paper, I would like to introduce how to start with deploying a mobile SSD v2 neural network on Raspberry 3 and NCS 2 and will give you some ideas and comparisons.
Description
A Neural Compute Stick 2 is the second generation of deep learning development kit from Intel that is claimed to provide 8 times performance gain compared to its predecessor Modivus NCS. The reason for such an improvement and heart of this device is the Intel latest VPU (Vision Processing Unit) Movidius Myriad X which includes 16 SHAVE cores ( Streaming Hybrid Architecture Vector Engine). It is 4 pieces with more than 12 cores in Myriad 2 installed in NCS of the first generation. Talking about the performance of NCS 2 compared to the well-known GPUs in the meaning of TFLOPS it is still a hundred times lower, so don’t rely on it as an attachment to your laptop to replace your PC with GTX 1080 Ti onboard. Designed to be a part of mobile projects NCS2 provides enough computational power while consuming as low as 1W of electrical power. Costing about 100$ makes it an affordable platform for such projects as a surveillance system for a smart house.
Operation principle
Intel also took care of simplifying deployment for your projects on embedded devices by providing an OpenVINO toolkit. It is designed to profile, tune, and deploy convolutional neural networks on low-power applications that require real-time inferencing. The set of software tools simplifies the process of deployment on various Intel AI solutions and supports models in Caffe, TensorFlow, MXNet and ONNX formats.
OpenVINO toolkit includes:
- Deep Learning Deployment Toolkit:
- Deep Learning Model Optimizer — A cross-platform command-line tool for importing models and preparing them for optimal execution with the Deep Learning Inference Engine. The Model Optimizer supports converting Caffe, TensorFlow, MXNet, Kaldi, ONNX models.
- Deep Learning Inference Engine — A unified API to allow high-performance inference on many hardware types including Intel® CPU, Intel® Processor Graphics, Intel® FPGA, Intel® Movidius™ Neural Compute Stick, and Intel® Neural Compute Stick 2.
- OpenCV — OpenCV which includes PVL (Photography Vision Library) libraries for computer vision.
- Drivers and runtimes for OpenCL
- Intel Media SDK
- OpenVX — Intel’s implementation of OpenVX optimized for running on Intel® hardware (CPU, GPU, IPU)
- Demos and samples.
As you have probably understood the neural networks would not run on the NSC 2 in its initial shape, and with to be processed with the inference engine need to be converted with Model Optimizer.


So now it is a perfect time to set up our plan.
First of all the usual communication interface for NCS 2 is USB 3.0, while the Raspberry 3, unfortunately, has only USB 2.0. This will probably slow down our system and for estimating the loss of the performance I will run the same object detection neural network first on NCS 2 connected to USB ports 2.0 and 3.0 of my laptop and try to figure out if there is a difference. Another interesting question is: Can NCS 2 be useful for testing object detection systems on laptops in general and will it outperform CPU?
Last but not least, I will deploy mobile SSD on the Raspberry and try to figure out whether I can achieve real-time object detection or it is going to be more of a slow slideshow.
Steps for deployment
Let’s arrange a checklist of all above-mentioned points:
- Install OpenVINO on the laptop
- Get mobile SSD v2 model from the tensorflow zoo
- Convert use Model Optimizer from Open VINO to convert mobile SSD v2 and run in on NCS 2 and CPU
- Install and configure OpenVINO on Raspberry
- Deploy the model on Raspberry
So let’s get our hands dirty with coding!
Running object detection on the laptop
First of all, I would like to share the link to the official documentation. I will describe steps for Ubuntu 16.04 but if you are a Mac or Windows user please consult with the guide.
Installation of the OpenVINO toolkit on the laptop
Download and install the latest distribution of the OpenVINO
You can use an installation GUI interface or follow instructions with the command line. For GUI installation run:
~/Downloads/<open_vino_version>/install_GUI.shAs the automatic installation process finishes, you need to take a few more steps:
Install External Software Dependencies
Note: The installation directory is not always the same as in the manual. If you can’t navigate to the folder you will need to find it manually. In my case, it has been installed in the home directory.
Then you may also need to make the file executable. Then run a script to download and install the external software dependencies:
cd ~/intel/openvino/install_dependencies sudo chmod ug+x ./install_openvino_dependencies.sh sudo -E ./install_openvino_dependencies.shSet up the Environment Variables
Modify setupvars.sh
Open setupvars.sh:
cd ~/intel/openvino/bin
sudo nano setupvars.sh
Add the following command at the bottom of setupvars.sh:
export LD_LIBRARY_PATH=/usr/lib/x86_64-linux-gnu/libOpenCL.so.1:$LD_LIBRARY_PATHSave and close the file, then reboot.
Modify .bashrc
If you want it installed permanently open
cd ~ && nano .bashrcAnd append the file with
~/intel/openvino/bin/setupvars.shSave and close. To check if everything is correct — open a new terminal session and you must see:
[setupvars.sh] OpenVINO environment initializedIf there is an error instead, check the setupvars.sh path.
Configure the Model Optimizer
There is a possibility to configure the optimizer for all model formats or to configure one at a time. As we only use TF in this paper’s scope let’s do the following steps:
cd ~/intel/openvino/deployment_tools/model_optimizer/install_prerequisites
sudo ./install_prerequisites_tf.sh
Run the Verification Scripts to Verify Installation
Note: The first verification script will not run if you don’t have Caffe MO installed.
~/intel/openvino/deployment_tools/demo/demo_security_barrier_camera.shSetup your NCS 2
Setup USB rules:
Add the current user to the users’ group:
sudo usermod -a -G users “$(whoami)”Log out and log in for it to take effect. To perform inference on Intel® Movidius™ Neural Compute Stick and Intel® Neural Compute Stick 2, install the USB rules as follows:
cd ~/Downloads
cat <<EOF > 97-usbboot.rules
SUBSYSTEM==”usb”, ATTRS{idProduct}==”2150″, ATTRS{idVendor}==”03e7″, GROUP=”users”, MODE=”0666″, ENV{ID_MM_DEVICE_IGNORE}=”1″ SUBSYSTEM==”usb”, ATTRS{idProduct}==”2485″, ATTRS{idVendor}==”03e7″, GROUP=”users”, MODE=”0666″, ENV{ID_MM_DEVICE_IGNORE}=”1″ SUBSYSTEM==”usb”, ATTRS{idProduct}==”f63b”, ATTRS{idVendor}==”03e7″, GROUP=”users”, MODE=”0666″, ENV{ID_MM_DEVICE_IGNORE}=”1″ EOF sudo cp 97-usbboot.rules /etc/udev/rules.d/ sudo udevadm control -reload-rules sudo udevadm trigger sudo ldconfig rm 97-usbboot.rules
Now we should be done and can proceed to further steps.
Running object detection neural network on a laptop using OpenVINO toolkit
Aiming our experiments at the embedded systems it would be reasonable to take a tiny model which is as computationally cheap as possible. Fortunately, there is a bunch of models available in the TF detection models zoo repository — you can download any model of your choice. I’m choosing the lightest model named ssdlite_mobilenet_v2_coco.
Download the model and unpack the archive.
Neural Compute Stick 2
To run TF model using OpenVINO toolkit we first need to convert it using the Model Optimiser. The optimizer takes several arguments as -input_model -model_name -output_dir and -tensorflow_object_detection_api_pipeline_config which are intuitively understandable, but if you are using a network like SSD you also should specify a parameter -tensorflow_use_custom_operations_config with the path to the configuration file for your network. Configuration files are available in OV toolkit in folder <OpenVINO path>/deployment_tools/model_optimizer/extensions/front/tf/ . Another point is that NCS 2 requires models to have -data_type FP16. Your resulting command will look something like:
python ~/intel/openvino/deployment_tools/model_optimizer/mo.py \
-input_model <path to your model>/frozen_inference_graph.pb \
-model_name SSD_lite_v2_FP16 \ -output_dir <path to save model> \
-tensorflow_use_custom_operations_config ~/intel/openvino/deployment_tools/model_optimizer/extensions/front/tf/ssd_v2_support.json \
-tensorflow_object_detection_api_pipeline_config <path to your model>/pipeline.config \
-data_type FP16
After executing the Model Optimizer creates for the IR graph and weights files with .xml and .bin extensions.
The next step is to clone the repository. Navigate into it and run the detector.py file.
The detector.py has several parameters and can run on both the CPU and NCS 2. However, running the model on CPU requires a bit different flow so let’s make it run on the MYRIAD.
python detector.py -m <path to the converted model folder> \
-d MYRIAD \
-labels <path to the .txt file with labels> labels.txt
The file labels.txt is available in the repository and includes all labels which were available in the original COCO dataset with 150+ classes.
To run an object detector on the CPU with Intel OpenVINO toolkit you obviously should have Intel CPU and you must convert the model to -data_type FP32.
python ~/intel/openvino/deployment_tools/model_optimizer/mo.py \
-input_model <path to your model>/frozen_inference_graph.pb \
-model_name SSD_lite_v2_FP32 \
-output_dir <path to save model> \
-tensorflow_use_custom_operations_config ~/intel/openvino/deployment_tools/model_optimizer/extensions/front/tf/ssd_v2_support.json \
-tensorflow_object_detection_api_pipeline_config <path to your model>/pipeline.config \
-data_type FP32
Another important difference that might be confusing is the necessity to specify the path to the MKLDNN library for CPU -l . The libraries are also available in OpenVINO toolkit in the folder
deployment_tools/inference_engine/lib/ubuntu_16.04/intel64/
So the command to run the detector will look like:
python detector.py -m ./converted_models/FP32 \
-l <OV path>/deployment_tools/inference_engine/lib/
<OS>/intel64/libcpu_extension_sse4.so \
-labels ./converted_models/labels.txt
Running object detection neural network on Raspberry Pi using OpenVINO toolkit an NCS 2
Installing OpenVINO on Raspberry Pi
From the beginning, I assume that you have Raspbian installed on your device and you will use the monitor because video streaming does not work correctly in the “headless mode”.
sudo apt-get install libjpeg-dev libpng-dev libtiff-dev
sudo apt-get install libavcodec-dev libavformat-dev libswscale-dev libv4l-dev
sudo apt-get install libxvidcore-dev libx264-dev
sudo apt-get install libgtk-3-dev
sudo apt-get install libcanberra-gtk*
sudo apt-get install libatlas-base-dev gfortran
sudo apt-get install python3-dev
Create a folder openvino. Download the OpenVINO toolkit for Raspberry from the link and unpack the archive into this folder.
3. We should start configuring OpenVINO toolkit on Raspberry by setting the installation path to the setupvar.sh file.
To do it, open the file with the command:
nano openvino/inference_engine_vpu_arm/bin/setupvars.shAnd change <INSTALLDIR> to your actual path to the inference_engine_vpu_arm folder. In my case it was /home/pi/openvino/inference_engine_vpu_arm
Save the file and close it.
Include setupvars.sh instructions to the .bashrc file
nano ~/.bashrc
source ~/openvino/inference_engine_vpu_arm/bin/setupvars.sh
Configure USB rules:
sudo usermod -a -G users “$(whoami)”
cd ~
sh openvino/inference_engine_vpu_arm/install_dependencies/
install_NCS_udev_rules.sh
Make OpenVINO virtual environment
Make a virtual environment and activate it (virtual environment should be installed):
mkvirtualenv openvino -p python3 workon openvinoLink the OpenVINO OpenCV to your env
Find the OpenVINO cv2.so file and copy its path. In my case the path looked like:
/home/pi/openvino/inference_engine_vpu_arm/python/<your python version>/cv2.cpython-<python version>m-arm-linux-gnueabihf.soNavigate to the site-packages folder in your environment:
cd ~/.virtualenvs/openvino/lib/<your python version>/site-packages/And link the .so file to cv2.so in this folder firing following line:
Finally, clone the repository converted model, activate your environment and run:
python detector.py -m <path to the converted model folder> \ -d MYRIAD \ -labels <path to the .txt file with labels> labels.txtResults

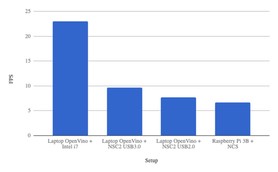
- Openvino toolkit allows running object detection at a very nice speed on the laptop using CPU. In my case Intel i7 gave about 23 FPS, providing a very smooth and nice image with 640×480 resolution. This result makes a combination of the toolkit and your laptop a great platform for home projects.
- Designed to work using USB 3.0 port, Intel Neural Compute Stick 2 works through USB 2.0 as well, but choosing the wrong port can cut your frame rate up to ~20%. This fact is especially important if you are choosing an embedded platform not only for prototyping but for working solution.
- Finally, NCS2 can turn your Raspberry Pi 3 to the platform suitable for deep learning projects. Plugged into one of the only available on this microcomputer USB 2.0 ports it gave a significant gain in FPS from ~1.1 FPS to ~6.7 FPS. However, the experiment with different USB ports on the laptop encourages to try launching NCS 2 on a device with USB 3.0, as it can give a few additional FPS improving the smoothness of the image.
Contact us if you have questions or ideas, and follow our blog updates.